
I submitted 2 recent sculptures to the 2012 “Art from the Heartland” show at the Indianapolis Art Center. It is a biennial exhibition showcasing the work of artists from Indiana, Ohio, Illinois, Kentucky, Michigan, and Wisconsin.
This year the show was curated by Paula Katz, Director and Curator of the Herron Galleries at the Herron School of Art and Design in Indianapolis. She awarded Best of Show, Best of 3D, Best of 2D, and 5 honorable mentions. I won the Best of 3D award for “Black and Blue #2” and “Black and Blue #3.”
Since 2011, I’ve been making 3D constructions of natural rubber–a radical departure from three decades of 2D fiber artwork–using fiber processes such as piecing and hand-stitching. I bind together my sculptures using a basic textile technique: a hand-sewn straight stitch. The form of my rubber constructions develops from the process.
This work is surprisingly organic and soft compared to the hard-edged aesthetic of earlier work. I’m excited about the new direction my work is taking and curious as to where it will lead.
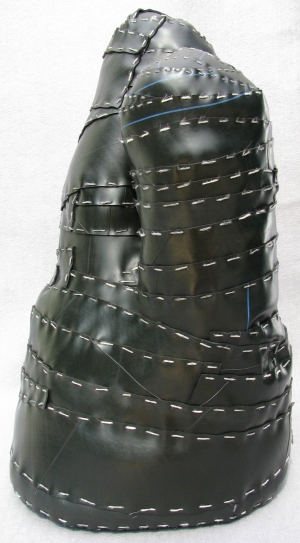
“Black and Blue #2”
2011
22″ x 13″ x 10″
rubber/ waxed linen cord
hand-stitching
private collection
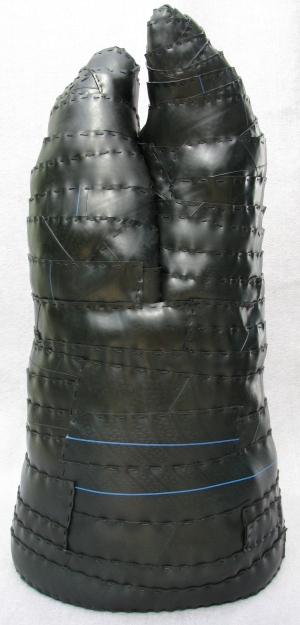
“Black and Blue #3”
2011
24″ x 13″ x 11″
rubber/ waxed linen cord
hand-stitching
ikat dyeing, color, spatial illusion
February 25, 2012
NOTE: Skip if not interested in the procedural aspects of dyeing wool…though scroll down and see the embedded photographs of my work.
This entry somewhat overlaps an earlier post on ikat dyeing (aka space dyeing), but is more specific as to the preparation of the yarn and additions of color to the dye baths.
In an earlier entry on ikat dyeing (aka space dyeing), I showed photographs of pieces in which dots and dashes of color or natural white added visual texture. These white dots are the original color of the yarn before I dyed it. To have sections of the skein of wool yarn resist absorption of the dye, I tightly wrap and tie random (or regular) sections of the (washed/rinsed/preferably dried) skein with plastic tape made specifically for this use. Particularly if I want only white dots, I’ll wind/tie one wrap of bean string. I space the tied sections evenly or haphazardly depending on the effect I want. Then I immerse the skeins into the prepared, hot dye bath. This dye bath contains the proportions of the different dye solutions that make up the dye formula I’m using to get color X.

"African Folds," detail, © 1990
To get colored rather than white dots or dashes on the dyed yarn, the procedure is basically the same except that I have dye the same skein in different dye baths–an extremely labor intensive and time consuming process. Say I want a medium blue yarn with lighter blue dots/dashes. First I need to prepare the dye formula for the medium blue I want, but I will be using only 50% of this dye solution in the first round of dyeing to get the lighter blue that will become the colored dots/dashes. I go through a whole dye session to get this 50% lighter blue. When the dye bath is clear, the first round of dyeing is done. I remove the skeins from the hot pots and let them cool until I can handle them. I then tightly tie sections of the yarn with plastic tape or bean string. The length of the tape-wrapped sections depends on whether I want long or short dashes of light blue. (Tufting produces loops as the needle goes through the backing. The amount of yarn that goes into each loop determines where the dots/dashes will appear on the tufted surface.)
I prepare a new dye bath with the remaining 50% of the dye formula for my medium blue. The wrapped sections will not absorb this dye and will remain light blue. I go through the whole dyeing process again and this time the unwrapped yarn absorbs the other half of the original dye solution for medium blue. When the dye bath is clear (all dye has been absorbed), I’m done except for rinsing the yarn, removing all the plastic ties, admiring the dashes of light blue against the darker blue, and hanging the wet yarn to dry.

"Amazonas," detail, © 1986
Say I want a blue yarn whose formula is made up of 30% red, 10% black B, 10% yellow, and 50% of alizarine blue. I can get a blue yarn with red dots or yellow dots although these hues will not be a saturated red nor yellow, but rather a pink and light yellow (because of the amount of red and yellow the formula calls for). For red/pink dots/dashes I’d have to initially dye the skein only with the 30% red part of the formula for blue. I go through the whole dye process till the dye bath is clear, take out the red/pink yarn, let it cool and start tying sections with plastic tape. These wrapped sections will remain pink through subsequent dyeing sessions. For the next dyeing session, I prepare the dye bath with the remaining colors that make up the blue formula. I immerse the tied pink yarn into the dye bath and go through the whole process till the dye bath is clear. I end up with a blue yarn with pink dots or dashes. Had I wanted yellow dots/dashes, I’d have substituted the 10% yellow dye for red in the first dye session
If I wanted a blue yarn with yellow and white dots/dashes, I’d tie the “virgin” yarn skein with plastic wrap to cover sections that I want to keep white. I then dye the yarn in the 10% yellow solution; get my yellow yarn dyed, and tie sections with tape that will resist the rest of the blue dye formula which goes into the next dye pot. I add the yarn to get it dyed blue. When done, I unwrap all the plastic ties and end up with my blue yarn with white and yellow dots/dashes.

"Jigsaw Puzzle," detail, © 1987
I find that ikat dyeing for colored dots/dashes works well with medium to dark colors. With lighter colors, I go for white dots/dashes because usually the % amounts of colored dots/dashes in the dye formula for color X are so light as to be not worth the trouble.

"Square Rug," detail, © 1984

"Square Rug," detail, © 1984

"Square Rug," detail, © 1984

"Square Rug," detail, © 1984
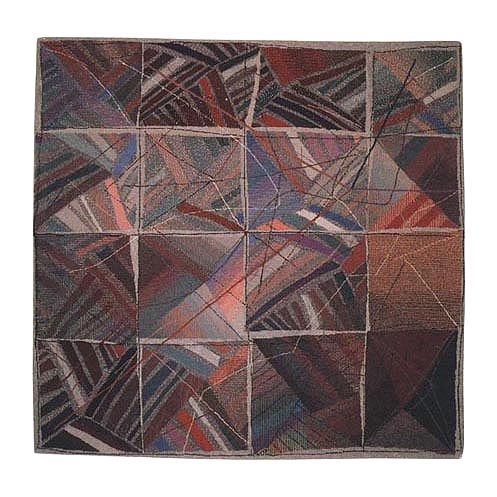
I practically ran amok in “Square Rug” in the density and variety of color and visual texture imparted on the piece via ikat dyeing. I get my dots and dashes to work in two ways here, both having to do with the illusion of space. When I use ikat dyed yarn to fill an area or shape, that area of color is pushed into the background giving the impression of great depth, of infinite space. When I tuft a gestural line of ikated yarn and have it cut across shapes and ground, it pops to the foreground and pushes the shapes it traverses into an indefinite middle ground. Neat-o.
I don’t do ikat dyeing any more for large pieces…it’s just too laborious and my work has evolved beyond what its effects add to my artwork. Over the years I have simplified my colors and my compositions so much so that ikated yarns would detract from what I’m now after (in 2012). In fact, I’ve gone so far as to remove color from my work–other than black and white–as in the pieced white organdy constructions sewn onto black plexiglas and the black 3D rubber constructions I make. Also, my tufted wool compositions became simpler (which does not translate into less complex) as I pared down my palette to one or two colors. I made ikated yarns and mottled colors integral to my compositions at the time (mid-’80s/early ’90s). They contributed mightily to the chaos and gestural aspects of my work and in defining illusionist space. By now, as my work has evolved and in certain ways simplified, my visual vocabulary has changed. It’s a big relief not to have to spend hours in a high humidity and smelly dye lab (from the glacial acidic acid used in dyeing with acid dyes). I did enjoy dyeing at the time, but wouldn’t do it today. I just don’t have the stamina or strength to repeatedly lift water-sopped or hot dye-bath sopped, weighty, industrial skeins of wool yarn in and out of wash and rinse buckets or dye pots. When a commission comes along, I go into my notebooks with color yarn samples to find the colors I want and hire a professional dye facility that specializes in small batch dye projects.
Ikat dyeing aka space dyeing
February 24, 2012
Ikat dyeing is an Indonesian resist method of dyeing yarn or threads so that when woven into cloth the resist sections produce patterns or designs. Simply put, resist dyeing involves applying a resist element to specific sections of the yarn–you bind sections with plastic tape or bean string–so that those areas cannot absorb dye during the dyeing process. The bound sections retain the color the binding element covers, which is generally a lighter value than the rest of the skein. A single wrap around/tie with plastic tape produces a 2-1/4″ section; a single wrap around/tie with bean string affects 1/2.” In tufting, the length of the loop affects the length of the resist dots and dashes visible on the surface of the tufted piece
The preparation of the wool skeins for ikat dyeing is labor intensive, as is the dyeing process for it usually involves more than one dye session. The yarn preparation involves winding and weighing the skeins, washing and drying them, and then binding sections to resist the dye. If you’re after dots/dashes of various colors or values, that involves more rounds of tying and dyeing.
For tufting, I want random or regularly spaced dots or dashes that the resist can produce. So I use the most elementary form of ikat in that I do not resist sections of yarn to produce definite patterns or designs as for ikat woven cloth. I bind the yarn either in a controlled (evenly spaced and of even length), or random manner (haphazard spacing and length for an irregular, scatter-shot effect) so’s to get dashes or dots of color (the resist sections).

"Peruvian Lattice," detail, 1988
In “Peruvian Lattice,” I use ikated yarn that has gone through one dye session to produce white dots and dashes. As I fill a shape with an ikated yarn, I cannot control where the dots will appear. Sometimes I get lucky and get a moire effect which becomes random patterning. In this piece, the ikated areas read as ground to the solid colored shapes giving more spatial depth to the composition than it otherwise would have.

"Dance of the Crane," detail, © 1985
For the white dots in “Dance of the Crane,” I used a bean string resist wound round once and tied–irregularly spaced. Some gray yarn I first dyed using part of my “Martha’s Gray” formula, then I wrapped/tied tape around 2″ randomly spaced sections and put it through a second dye session using the remaining ingredients to the formula. The dark gray triangle at top/center was done this way.
I pulled some yarn sample sheets from my “Constrictor Constrictor” folder to show examples of tape bound/tied and bean string tied resists.

dot and dash resist
You’ll notice that I did a sample dyeing on only 10 gms of wool to test results of the resist and of the dye formula.

ikat samples
Samples 1-7 above were bound/tied in 2″ – 3″ sections (to get white sections and in addition either a rust hue or burgundy hue in subsequent dye sequences).
To get #5:
Session 1: I wound and tied tape over “virgin” skein every 2″ or so for a 2″ – 3″ long resist (to keep those sections white). I used only the burgundy toner at 0.8%. After dyeing the yarn burgundy, I removed some sections of tape (exposing some white sections but keeping some bound sections intact) and bound/tied over some burgundy sections (to keep them burgundy).
Session 2: this time I added 0.2% of rust toner. The white sections now took the rust dye. Sections that never got bound/tied absorbed both the rust toner and the burgundy toner (from session 1). So I ended up with yarn that had sections of white (remained tied throughout all dye sessions), burgundy, rust, and the rust/burgundy formula color–4 colors. I removed all ties and rinsed the yarn, then air dried it. Voilá.
Look at the first sample below the wavy line: it’s burgundy, red, blue, rust, and white. (See the stretched out yarn below, left.) I followed sessions 1 and 2 above and kept the tape on bound sections. Rinse/dry followed the next dyeing session.
Session 3: One taped section of this 16″ sample of #5 remained tied throughout the dye sessions to keep that section white. I untied some taped sections of white to take a blue dye in this dye session. I wound/tied some red and some rust sections to keep them red and rust. Then I overdyed the yarn with a blue dye solution (its formula is 3.0 % sky blue RL + 0.4 % of a warm toner). I got red, blue, white, rust, and the blur + over-dyed burgundy. I removed all the tape and rinsed and dried the yarn. Voilá.

2 ikat samples
The yarn sample on the right is white, rust + over-dye of rust/burgundy formula for #5 in the first photo of samples.

"Constrictor Constrictor," detail, © 1984
“Constrictor Constrictor” is the first piece I made in which I used ikat dyed yarn. The random dots are white though some show some coloration that can occur at the beginning and end of each bound section. This is due to some migration of the dye under the edges of the resist sections.
The finished piece:

"Constrictor Constrictor," © 1984 Martha Donovan Opdahl, 96" x 74"
Dyeing Mottled Colors…more on dyeing at IU
January 12, 2012
Where was I?…My last entry was September, 2008. It’s now January of 2012! Sorry to have left dangling those of you following my notes about dyeing yarn especially since I’d set up expectations for my next entry on mottled colors. I hadn’t realized how much thought and time would go into writing about my experiences as an artist making art. Writing was taking time away from art making itself as well as from other claims on my time. Plus I hadn’t intended on writing about the technical aspects of art making–such as dyeing wool–because it doesn’t interest me as much as writing about the art making process itself, and more important to me, about the finished object itself. More on this eventually…
Recently I got an email from someone who happened upon my dyeing entry and had gone through the MFA program in textiles at Indiana University in the ’90s. My earlier notes rang true to his experience there and led to his contacting me. I realized there was more I had to say about dyeing yarn…mottled yarn.
In Budd Stalnaker’s Woven and Constructed studio classes, we had to gain expertise of the technical side of different textile processes. For example, in weaving: basics, like how to dress the loom; how to achieve even selvages by control of the sideways pull of the weft; various weft joining techniques and edge finishings. In dyeing wool yarn: how to achieve even, level colors; make dye solutions; do 2-3-way color mixes; achieve complex colors through the use of toners; etc. All these took practice and patience to achieve control.
Impatience is one of my most endearing traits–and it sometimes leads to road blocks as I work be it while dyeing yarn, cutting shapes out of yardage, composing or constructing a piece. More often than I care to admit, I find that I have to re-do or unravel or re-cut or re-measure due to impulsive actions–not looking before I leap. “What have I done? Now what do I do?” The problems it creates for me are challenges I love to work out: how to extricate myself out of this hole.
Early in learning how to dye wool yarn in the dye lab, I noticed that some of my colors turned out blotchy, streaked, or variegated. Not good since the aim was level, even colors. This result was unexpected…“What went wrong?” Being an impatient dyer, I’d strayed away from the do’s and don’ts. While the dye pots simmered over the gas flames and the yarn was absorbing the dye, I’d gone off to do something else to make good use of my time. Every so often I’d run back to the burners to check on progress and give the yarn a stir . I’d crowded the pots with many skeins of yarn so’s to cut down on the number of dye sessions–the more skeins to a pot, the less pots to dye.
This loosey goosey approach to dyeing practically guaranteed I’d end up with problems. I figured out what went wrong: I hadn’t kept the skeins of yarn from bunching up against each other in the dye bath nor had I diligently stirred the dye pot for umpteen minutes while the wool absorbed the dye. Hence the wool couldn’t absorb the dye–not evenly. Crowded skeins do not allow the dye to penetrate the fibers freely and evenly and the lack of stirring contributed to this fiasco. It reminded me of Julia Child’s advice not to crowd the pan with whatever you are sauteing or browning because by crowding you end up steaming the food–a different cooking process which produces different results . I got unintended results rather than predictable ones–the whole point of being in control of the dye process.
Once I’d rinsed and dried and wound the yarn into balls, I had to make use of it. I couldn’t let that splotchy yarn go to waste (my third world background in which you find a use for everything), but how was I to make lemonade out of lemons? The goof, it turns out, was serendipitous good luck.
For me, the most exciting part of a project is to recognize a technical or aesthetic glitch when it occurs–what’s gone awry in the process, composition or construction–and turn it to my advantage. I get great satisfaction in making pluses out of minuses–being able to salvage–better yet, to improve on the color or the shape or the line by incorporating the glitch and following where it might take me, or by tweaking it so that it becomes an intended and integral part of the process and end product.
I used this yarn to tuft a section of a piece letting the ball unravel as line by tufted line I filled a shape with color. The result was an area of irregular color, often with a moire effect. Hmmmmmmm…. interesting! I recognized that these mottled areas added visual texture and complexity to that shape. Looking at the larger composition-in-progress, I could see that the mottling effect actually contributed to what I wanted my work to express. The splotchy areas of color convey messiness, capriciousness, randomness, whereas the areas with level, even, “perfect” colors convey control, precision and order. I had inadvertently hit upon an additional way to represent chaos in my compositions–the “chaos” in the play of chaos versus order that I feel and want to express. By seeing this possibility in the mottled hues, I’d inadvertently improved the piece. The key was recognizing the blotches for what they were…chaos. By looking and noticing I was seeing what was in front of me. Now you know why, when needed, I dye blotchy colors.

"Peruvian Lattice," ©1988 Martha Donovan Opdahl, 60" x 120", tufted wool yarn/ cotton backing/ acid dyes. Notice areas of mottled colors. Yessss!

Detail of "Peruvian Lattice." Mottling and moire effects are more visible here.

"Trio Incognito," ©1987 Martha Donovan Opdahl, 74" x 77,"tufted wool pile/ cotton backing/ acid dyes

Detail: "Trio Incognito." Mottled and moire effects contained by the geometric shapes = chaos/order
An added bonus: It turns out that this messed-up yarn was a perfect fit for my impatient way of working. I took to deliberately crowding the yarn in the dye pots and to being even careless and slap-dash in measuring the dye solution into the dye bath. So what if the yarn from pot A which “should” have matched the yarn in pot B didn’t–it’s close enough. The result was intentional. Plus I was inconstant in stirring the pot. I was totally irreverent toward the haloed rules. My method matched my purpose and it felt right–I made my impatience work for me.
Finding my way to art school
September 7, 2008
I did not come to making art from an art background. I got into art through the back door, so to speak, when I was in my thirties.
Growing up, I was exposed to every kind of stitchery having been born and brought up in Peru and elsewhere where such domestic needle skills are handed down from mother to daughter (are they still?) My Spanish grandmother was a stitching whiz. She could glance at a sweater and figure out how to knit it. Ditto with the crochet hook. She was also inventive: she knitted, crocheted, and embroidered on the fly–no notes, no pattern– everything skillfully made. Her house had a cuarto de costura–a sewing room–where her fabrics, yarns, and sewing basket were kept in a large armoire next to her sewing machine. I was very young then, yet remember whiling away afternoon hours there and having tea with my aunts or whoever had come by for a visit. I can bring back that special cozy feeling of contentment and warmth that room meant to me. Yet I myself wanted nada to do with sewing…I was a tomboy and couldn’t be less interested. Looking back: what a waste!
My early schooling did not include art classes—they weren’t offered. I take that back. In a junior high class in Bolivia I’d worked forever on a needlepoint project for the labores manuales class. It entailed filling in the background–in a mind-numbing beige yarn which came with the kit–of a pre-stitched figure of a bonnetted Victorian woman dressed in blue. I hated working on it. The teacher called me Penelope referring to the mythological character who every night for twenty years pulled out what she’d stitched during the day so as to thwart the advances of suitors as she delayed the completion of her project in anticipation of her husband’s return from the war.
Not having gone to school in the US (other than second grade), where by the time you are in high school you are thinking about college and about a career, I didn’t realize there were major choices to be made….that I could shape my life. I simply didn’t think in those terms for I’d never had to make such choices. I pretty much dutifully did as I was told. In hindsight, I’m aghast at my cluelessness. Such an ingenue! What was I thinking? Mostly, of getting educated, but not much beyond that.
Fast forward to undergraduate years. At the University of Wisconsin-Madison, I’d loved my freshman and sophomore years. I took courses from some inspired teachers: Prof. Frazer in Zoology, my first big lecture course; Prof. Alvin Whitley’s mesmerizing lectures on Romantic Poetry; Prof. Whelan’s (sp?) philosophy course in which I first encountered phenomenology. I didn’t consider taking art courses other than an art history class from an extraordinarily handsome and meticulously, starchedly dressed young professor who taught in the dark showing slides of Baroque painting toward which I’ve had a visceral revulsion to this day. Voluptuous female figures in unnatural, tippy-toed poses; picnic scenes of overdressed period characters; stage backdrop landscapes of peaks in distant misty blue. That negative art history experience did not encourage me to take more classes in art.
One summer session, I had a roommate from New York. She was taking a sculpture class and one day brought back to the dorm a maquette she was working on–a clay self-portrait. I was intrigued and incredulous: she was taking a college course that didn’t involve grinding reading and writing. She never had reading assignments nor a paper due. The world of studio art was unknown to me. Could students take such classes and make something out of a clump of clay for credit? The first and last time I’d done that was with Play Doh in nursery school. She seemed ordinary enough though more sophisticated and learned in music and art than I was. She didn’t look like what I’d imagined an artist should look like and dress like. She was my roommate and made art? Weren’t artists a breed apart?…geniuses?…in outre get-ups? How did she know she was an artist, or was it pure chutzpah on her part to aspire to be one? Where did she get ideas of what to make? Yet, here she was modeling a bust of herself–the problem of what to make solved. Perhaps making art was something one did during summer session. I wished I’d heard about it though with no experience in making art, I wouldn’t have dared to sign up.
The academic side of my junior and senior years at UW was a disappointment. My gringo father suggested I consider Hispanic Studies as a course of studies. He believed, with good intentions, that I ought to learn about my Spanish heritage. I dutifully declared my major. I took courses in Spanish and Latin American literature, civilization, and history by some pedantic scholars. The exception that stands out was a history course taught by Professor Philip Curtin whose interest was the African slave trade. He was thoroughly knowledgeable about his subject, passionate about ideas, and incisively clear thinking. He wholly engaged the students (most of whom were graduate students) for an intense, cerebral hour. Other than that course, I was not satisfied with my major, but I didn’t have the wit to switch.
Coda: Curious to know what had become of Prof. Curtin, I did a quick google search. It turns out he’s a highly respected historian who has caused seismic shifts in the focus of research on Africa. He’s written many influential and oft-quoted books. He shook things up with his sometimes controversial views as, for example, the historical relevance of oral tradition in Africa. Among his many honors, he’s a MacArthur Fellow! And he’s Professor Emeritus at Johns Hopkins University. Bravo Professor Curtin! I should have switched my major to African Studies!
In the Latin American context of classes I took (excluding Curtin’s), “civilization” began in 1492 with the arrival of the Spaniards. Whatever had occurred before was the dark ages. I got the distinct impression that what went before was not being studied nor worth studying since they were “primitive” cultures. Yet, actually, archaeologists, anthropologists, folklorists, and ethnobotanists were making discoveries along river valleys in the arid coast of Peru. They dug through middens counting unearthed beans and corn kernels and fish bones to determine food sources, harvests, droughts, and population sizes and movements; they unwrapped mummy bundles in grave sites finding clues to specialized classes of weavers which pointed to priestly hierarchies of rulers. Folklorists studied the oral traditions of ancient myths from pre-conquest times as written down by post-conquest scribes. There must have been university courses that covered these subjects, but I didn’t know about them. I would have loved to have studied them for I’d been brought up in the Andes in the midst of Quechua and Aymara Indians and felt an affinity for their cultures. I wish I’d learned to speak Quechua as a child, but now I see that such a notion then was unthinkable being of a class that denigrated the natives.
I also lacked the confidence to “follow my bliss” because I didn’t know what my bliss was. In retrospect, I was floundering. Through a process of elimination, I was beginning to find out what didn’t appeal to me. And by default and unawares–for I was not consciously seeking something to dedicate my life to—I was discovering what I had no passionate interest in nor natural ability for.
Fast forward to post-college years. I moved to Indiana with my professor husband (who I had met at UW) to a small college town where I dedicated myself to bringing up our two children. I hadn’t done much sewing other than mending torn jeans, replacing broken zippers and lost shirt buttons. Early in my marriage, my husband gave me the book Crafts Design by Moseley, Johnson and Koenig, which I still have. He realized I was searching for something I could apply myself to. My first effort at handicraft was to make a hooked throw rug (nesting?) using Aunt Lydia’s acrylic yarn from Woolworth’s. I made up the simple design–2 rows of a repeated orange escutchion on a solid green ground. B-o-r-ing. It reminded me of the tedious needlepoint effort in junior high. The rug’s colors were dull; the yarn had no spring to it for the pile matted down where stepped on.
It’s interesting that during those years my creative outlet found its way to textiles in one way or another. I dabbled in various sewing projects as a hobby learning techniques from library books. Before long I got my own books–mostly how-to books. An early purchase was Erica Wilson’s Embroidery Book which I still use for reference. I appliqued and embroidered baby quilts for the nursery wall based on Mother Goose rhymes. I stitched dolls and felt Christmas tree ornaments from patterns in magazines like Woman’s Day that I’d pick up at the supermarket checkout counter. A couple of useful books were Jean Laury’s on applique followed by Beth and Jeff Gutcheon’s inspiring book on making quilts (both of these I loaned to someone long ago and never got back–grrrr). The Gutcheon book drew me in the direction of quilts. I pieced traditional quilt blocks which eventually led to my developing original designs. For awhile I was enamored of trapunto and made several white pillows and wall hangings.

Jack in the Box, detail. Trapunto.
Needing pin money to help finance my needlework–but mostly to make space for new projects–one October I rented space for a booth at the week-long Covered Bridge Festival in nearby Mansfield. It was a particularly cold and wet week, but I sold some quilts which made the effort worthwhile.
Probably my most ambitious project was learning how to silk screen on fabric (can’t recall which book taught me the basics). I designed a series of animals that I silk-screened on a one-yard square of muslin. The animals were in pattern pieces, to be cut out, sewn together and stuffed with polyfill. It had been exacting work to figure out the patterns so as to get a fully realized 3-D boa constrictor or whale or rhinoceros or elephant when the corresponding pieces were sewn together. In truth, I preferred to look at the fragmented parts inked on the muslin square pinned to a wall more than the finished stuffed animal. Something about the 2-D sharp and abstract silhouettes of the patterns appealed to me. They are as close to being art objects as anything I’d made till then. I could just as easily have silk-screened drawings on paper, but fabric was the draw and fragmented patterns the means.

Constrictor Constrictor ©1975 silk screen on muslin, 40"x40"
In 1977, I participated in a national quilt contest–the “Flower Garden Quilt Contest”–sponsored by the Indianapolis Star newspaper. It was my first entry into a juried show. The contestants were each to produce a quilt based on a set of 24 flower designs by Ruby McKim. You could stitch them any way you liked, but the sponsors wanted contemporary interpretations–not what your grandmother would have made. I decided on bold, solid colors using a reverse applique technique to render stylized versions of the traditional McKim designs. I was influenced by “The Rockefeller Quilt” designed by Dorothy Weatherford, designer for the Mountain Artisans Cooperative of West Virginia. (That quilt was a gift from the quilters to Sharon Percy Rockefeller for her support in their efforts to establish and maintain their cooperative.) The Flower Garden contest drew many beautiful and inventive entries. In the end, I won first place with mine, which disgruntled many. Yet one viewer at the show declared it was “the only contemporary quilt” there. It was a welcome compliment amidst the dissenting noise. Coda: The quilt was purchased by Sharon Rockefeller.

Flower Garden ©1977 cotton/poly 118"x104"
By now I’d grown restless. Women were seeking fulfillment outside the home. Feminism was in the air and I was receptive to its message. Domesticity and female handiwork were out; careerism and using one’s brain were in. Stirrings of dissatisfaction percolated–of something missing or my missing out. Taking care of the children was becoming less demanding now that they were in school. I had time on my hands. I knew I could be accomplished at something…but what? I didn’t want to pursue stitchery because it couldn’t shake the perception of its being a hobby. In addition, it had all that baggage of female domesticity–the taint of brainless women’s work. Getting a brainy advanced degree seemed doable and the way to go with Indiana University (IU) being fairly close (Bloomington is an hour’s drive from our house). And my husband would be taking a sabbatical year off from teaching so he could cover the home front while I was away during the day. I discovered that IU offered courses in authocthonous cultures…Andean even. I got curious…
Looking through the IU graduate courses offerings, I find that so-called “primitive” cultures are a legitimate field of study. I was elated. I signed up for courses toward an M.A. degree in Latin American Studies intending to study pre-Columbian subjects. What I “would do with it” I wasn’t sure…something would develop. My husband was agreeable to this venture so off I went, commuting daily to Bloomington. I studied hard for I’m a grind. Andean textiles caught my eye–their colorful and orderly abstraction and stylization. At the suggestion of my advisor, Professor Roy Sieber, I signed up for a beginning weaving course with Budd Stalnaker in the Fine Arts School to learn the nuts and bolts of how textiles are made. Unbeknownst to me at the time, this course would change my life.
Budd’s interests lay beyond the mechanics of cloth-making (though he was a bear about teaching the techniques and the students’ mastery of the loom and dyeing). His was an art studio class and Aesthetics was his numero uno concern. He knew more about color than most artists and had an incredibly discerning eye. Teaching us how to see by way of leading questions was a central part of class critiques. I soon realized that more was expected of me than producing even selvages.
These are samples of early tapestry class assignments. They’re 3″ x 3″ studies in 2-ply wool yarn on a linen warp, my first serious creative efforts in fiber. Each was my solution to an assigned problem. Baby steps.

Tapestry samples from beginning weaving and dye course
I’d never thought of weaving as brain work, yet all the assignments in “Beginning Woven and Constructed” involved problem-solving of a kind I found to be challenging and satisfying work. I’d never thought of myself as an artist; making art was what artists did. Yet in the Fine Arts building I was among people who took making art seriously and discussed aesthetics on a higher plane than as mere technique. It was a revelation to me that others responded as I did to, say, a red mark on a black ground. They didn’t just respond to such an aesthetic experience, but dedicated their lives to making such marks. I was home.
I decided to apply to the MFA program in fiber. I recall the interview I had with Budd in which he seemed concerned about my being able to switch from a verbal to a visual vocabulary. For whatever reasons, he accepted me into the graduate program. I now think that I was always a visual person but had been living in a verbal universe. I’d been a fish out of water. Now I was in my element and Budd was offering me a chance to swim.
Abstract Fiber: line / pattern / structure / disorder
August 19, 2008
In this post I will give you a broad overview of how my work has evolved. I begin with what my work is about and then show you examples of representative pieces.
I make large-scale tufted wool wall pieces and, on a more intimate scale, pieced organdy constructions sewn onto acrylic. My approach is intuitive and spontaneous producing compositions with the gestural line of drawings and the measure and control of geometry. Yet the pieces remain true to the special qualities of the materials.
In my work, I offer a structure that is formal and spare, stressing silhouette, shape, surface, and line. I translate felt tensions into visual tensions. I feel a strong drive for order and yet I immediately rebel against it, embracing disorder-which one can also call spontaneity, lyricism, freedom. Lines begin and disappear; patterns swirl and dissolve; an ordered structure is often subverted by the movement of the fluid background. I see these tensions as a reflection of a central conflict in real life. What life feels like is the narrative my work relates in abstract compositions. Neither order nor chaos wins; the fun lies in the completely natural encounter between the two.
I completed this piece right out of graduate school. (It is now in the collection of the Indianapolis Museum of Art.)
Chromatic Fugue ©1986
My approach then was more painterly than what I do now. Current work is more linear and monochromatic as in Blue Matter, a recent commission (Wachovia Bank headquarters, Charlotte, NC):

Blue Matter ©2008
In the monochromatic tufted pieces, you still do get zapped with an area of intense color which holds its own against the swirl of hatched patterning. And not just any color…but yellow! which I recall being told had to be used sparingly. It’s interesting that in the order/ disorder struggle, in these pieces fluid, energetic lines are actually stripes of alternating white and deep blue. You can’t get more orderly and controlled than by the repetition of parallel lines which become patterned channels of energy.
I’d never thought in terms of having a painterly or linear approach. I picked up on this difference among artists from reading some time ago that Picasso had a gift for line. Since then I’ve taken notice that other artists lean more in one direction than in the other (duh!). I love line. My emphasis on line comes at the expense of color for I pared it way down to monochromatic, especially in my stitched organdy constructions. Perhaps this leap from tufting on a large scale to piecing relatively small pieces came about as color dropped away and line ascended. Line plays a different role in the pieced work. It’s more architectural, as artspeak would put it.
Since 2003, I’ve needed a more portable process for making art for our lives now involved more travel which meant being away from my studio (though I continue to make large tufted pieces). I began working on a more intimate scale piecing white cotton organdy and sewing it onto black plexiglass . My love of line comes through in the stitched and folded seams which become structural, like scaffolding. The contrasting translucency of the adjacent shapes reveals the lines. The layering of shapes provides more opacity and more rhythmic contrasts. This work has evolved from an initial series of buttons + machine top-stitched organdy compositions, to pieced and layered formal constructs, to the more recent exploding silhouettes. Their intimate size and monochromatic palette of whites makes for quiet, meditative works–like whispers.

Construction #13 ©2003
In my next post, I will write about how I, a late bloomer, got started making art.
Introducing my work…
August 1, 2008
Welcome to my site.
I am an artist working in fiber in studios in New Mexico and Indiana. I am using this venue to bring my artwork to a wider audience. I’ve considered having a website, but ultimately wanted something less “official” and careerist; more informal and personal. Some channel in which I could control the presentation of my work. Some tool that I could manage myself. Some device through which I could connect with other artists or with whoever is interested in what I do.
I happened on this venue by chance…it was a eureka! occasion for I realized that it fits my needs. In addition to being able to link viewers to images of my work through the Flickr link, I can occasionally submit entries that reflect on my ongoing activities that relate to my artwork. Also, I can share my thoughts on various aspects of art-making…somewhat like journal entries, though I do not keep a journal. I do, however, scribble notes to myself in a notebook (notebooks!) commenting on an article I’m reading, say, or on some insight an author or someone made that even remotely relates to my artwork. Like keen, intelligent observations made by Joan Acocella regarding some ballet dancer’s footwork, say. Or, Arthur Danto, in writing about Martin Puryear’s recent show at MOMA, providing insights on his work that resonate with me. I want to revisit these scattered jottings and reflections for in the past they affirmed or redirected or gave justification (!) to what I was making at the time.
I also want to “think aloud” about my current efforts and how my art is evolving. And look back and reconsider older work of mine, perhaps in a new light. There’s a coherence to what I make…within each piece (they’ve been described as “worlds onto themselves”) as well as to the trajectory of the whole body of my work. One can follow threads over the years that lead to where it is now…or where I am now. I’d like to write about the shifts and changes in my work. Reflect on paths not taken. Paths taken. Most often, I’m not conscious or aware of what I’m actually doing for I let the art-making process lead me. I want to explore my choices (aesthetic as well as problem solving decisions) for I find that becoming aware of what decisions I’ve made has in the past nudged the work in unexpected and wonderful directions.
I know how some other artists work and think about their work. Often I’m surprised that I don’t work that way or think about it their way. My submissions might spark a recognition in others of shared concerns. I am a private person by disposition living in rural areas of the southwest and midwest. I am not adept at networking and making and sustaining connections with other artists. Perhaps I am too focused and driven to make time for these relationships. Talking about my work in public can be difficult for me. But writing about it…just putting my images and thoughts “out there” to be a part of a larger conversation without having to be there in person…that appeals to me. I think I have thoughts to share that others might want to hear–or not. Hence this venue, these notes…and future notes. Stay tuned.


